Replace EM34 with 6E5C
This is an old article of mine from 2011. I had just then realized how expensive EM34 magic eye tubes were (and still are). I did some google things and found out that Russian 6E5C tube would be a good replacement. Back then Russia was still seen as a somewhat sensible country, not so much in 2022. Wind of change for the worst.
You can replace many western tubes with Russian equivalents. Some tube types are 1:1 drop in replacements, some requires minor modifications. For example, 6n2p-ev is a very good replacement for ECC83/12AX7, Heater wiring is different, but modification is very easy. With 6E5C indicator tube modifications are a bit more involved, but nothing too big.
Most hobbyist have noticed by now (as 2022) that EM34 indicator tube is quite rare and very expensive. And even if 6E5C is not exactly cheap anymore (it was in 2011 when this article was first written), it’s still only a fraction of a cost of EM34. Biggest difference between these tubes is the sensitivity ranges. EM34 has two different sensitivity “systems” as Phillips describes them, and 6E5C only has one. This is not a big deal in tube radios, but for some test equipment might need two sensitivity ranges. I used a Finnish ASA 597 radio as a test subject. Results were good!
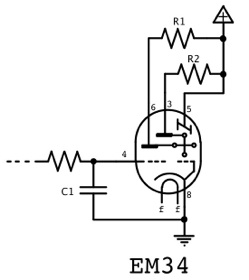
All modifications must be done before any testing. If you change the tubes without modifications, something will go wrong and there will be smoke and everything and everyone would be very sad. Pictures below shows the wiring difference between these tubes.

If you have experience with old tube radios, you can probably make all the necessary changes from the pictures above. Most old radios are like rats nest. Horrible to work with, and sometimes it takes a lot of work just to get your hands on all the necessary components. So enough about how point to point is so easy to service and modify. It most definitely is not. So, take your time and be careful.
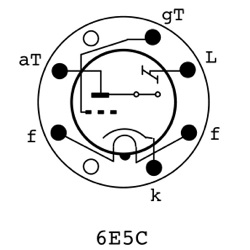
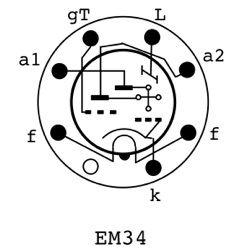
Now we have to rewire the tube socket. Pictures above are viewed from behind the sockets, or from the bottom i.e. the solder side. So, what do we have to do? As we can see from the pictures, heaters (f) and cathode (k) are in identical places. Anode of the amplification triode should be on pin 3. We will remove resistor R1 from pin 6. We will then move the triode grid (gt) from pin 4 to pin 5 and deflection surface from pin 5 to pin 6. For the resistor and capacitor values, use the ones in your radio. That’s it! Now we can test our new tube.
Like I said I used a Finnish ASA 597 radio as a test bench. It’s very basic radio and results were very good! Reflective surface of 6E5C is divided half and there are small lines between the sections. One half (180°) is always full brightness and other half has a shadow to indicate the tuning. In my radio the small lines were not exactly horizontal, so I had to adjust the bracket holding the tube. But this will of course depend on the radio you are working with. Another thing to be aware of the physical size of the tube. Russian tubes tend to be slightly larger that European counter parts. I don’t know why, and 6E5C is no exception. It’s about 4mm taller and might be a tight fit in some radios.
One last thing! It’s worth mention that sometimes radios use a slightly smaller voltage. For example, my ASA 597 had only 190 volts on anodes and there was no higher voltage available. If you can increase the voltage of EM34 up to 250 volts, it might improve the brightness. But this is of course again very much dependent on the radio you are working with.